How to photograph water droplets
How to photograph water droplets. (Some super easy steps to get you started).
What is it about water photography that is so mesmerising?
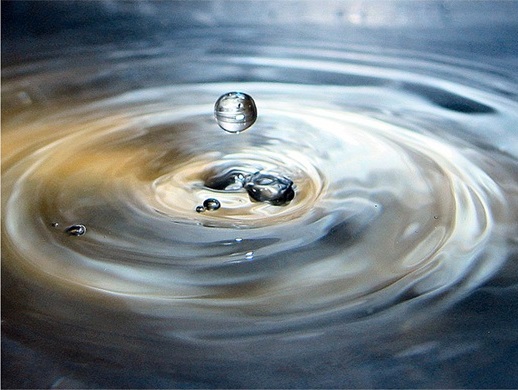
Maybe it's the surf, a creek, the rain or simply a drop delicately dangling from a tap. However you photograph it water provides quite the artistic opportunity. (photo)
That's why we're excited about our inaugural monthly PC water photography competition.Join our Flickr group and upload your best water shot taken this month. And you could win the coveted PC cap!
OK, so exactly... how do you photograph water droplets?
You'll need seven things to get you started.
1. A tripod.
2. A water dropper.
3. A bowl or plate for the water to fall in to.
4. A pencil (or pen).
5. Light (whether natural or flash or lamp).
6. A glass of water.
7. Patience!
The location:
Find a place in your house where there's plenty of light. You'll need to use a fast shutter speed to 'freeze' the drops so that means lots of light either ambient or artificial.
Also make sure there's no power points or electrical items hanging around. Just in case you tip the bowl over in a photographic frenzy!
Remember that water reflects, so make sure whatever is reflecting in the water is something you're happy with. You don't want the perfect shot to be marred by the reflection of that overdue gas bill you have stuck to the fridge.
Make the location as dust and (in my case) dog hair free as possible. Hair or particles floating on the water looks a tad dodgy.
The bowl:
The bowl or plate you have the water drop fall in to is a key part of the composition. As I said earlier water reflects. It's also transparent so it will pick up on the colours or lack there of, of the bowl. Use this to your advantage if you want to match a particular colour theme, or if you're looking for something a bit more sophisticated grab a stainless steel bowl.
Remember the colours or pattern will not only be visible in the water in the bowl but also in the droplet. Cool huh?
The camera:
Set the camera up a comfortable distance from the water droplet. Comfortable enough that it doesn't get splashed but close enough so that the water droplet is clear and visible in the frame. Obviously the actual distance is determined by the focal length of your lens, so you might have to play around with this a bit.
The Lens:
Your aperture choice is up to you. As you know the shallower your depth of field (the small f/stop numbers) the less the background will be in focus. The larger the numbers the more will be in focus. I reckon start out with an aperture of around f/11. That way the drop and most of the ripples should be in focus. This of course means you need enough light to be able to get away with f/11. If you don't then open the aperture wider. It's not the end of the world. Just see what you can get away with.
The shutter speed:
You want this to be as fast as possible. Water drops pretty rapidly so to get it sharp you have to have a high shutter speed. Again as ever this depends on the aperture and available light. If you can't get it high enough then either dial up the ISO (not preferred) or get some light from somewhere whether it be a flash or a lamp/light. Remembering of course a burst of light will also reflect on the water.
The Tripod:
You'll need a tripod even though your shutter speed will be fast. trust me you'll be flat out handling the shutter and the water dropper at the same time (seriously it takes practice!) It also keeps everything in place and that's going to help a lot with your focus because you need to…
Shoot with manual focus:
Auto focus no matter how quick your DSLR is takes a moment to lock in. And by that moment the water will probably have dropped. So...use manual focus, then the lens is set and if you position your tripod securely it should remain all good for the duration of your shots.
What about the pen?
Aha, I knew you'd ask. Well the pen or pencil, or fork or spoon or whatever you use is all to do with the above point - photographing with manual focus. Again because the water drops so fast you won't have time to focus on it manually. So you position the pen (or similar object) where the drop will be falling and focus on that. Lock the focus then take the pen away and make sure every time you drop the drop, it falls along the path of where the pen was standing. That way it should (read: should) always be in focus. It's a great tip for those of us who wear glasses.
The background:
You may or may not be able to see the background due to the angle of your camera. BUT the background will still impact the shot for all the afore mentioned reflection issues. So make it as plain as possible. It can be coloured, black or white but make it a flat one colour job. You can get artier and fartier later, but whilst you're beginning start simple.
Patience.
Ahhh yes, that old chestnut. Indeed this art takes practice and a heck of a lot of shots. (Thank the good Lord for digital). But once you get in to it it's highly addictive.
You can completely change the look by changing the angle, props, light and of course the usuals: shutter speed, aperture and even if you must ISO.


Comments
Post a Comment